baked sweet potato fries

whisk and heels - baked sweet potato fries - 3web

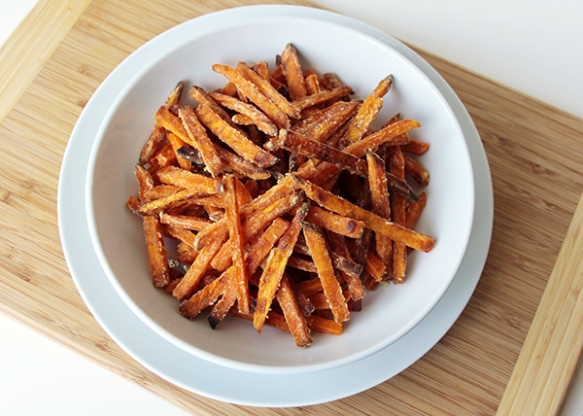
Okay, while the rest of the world is busy giving up their favorite things to keep their bikini bods all summer long, I’m happily munching on my favorite potato in it’s most perfect form.  And while I probably won’t share my plate of baked sweet potato fries, I’m willing to tell you how to make them.

whisk and heels - baked sweet potato fries - 2web

whisk and heels - baked sweet potato fries

This is a simple recipe, but benefits greatly from attention to detail and technique.  What I mean by this is… when I say you’re going for 1/4 inch chunks, I mean it.  And your fries will be better if you listen to me.  And when I say a single layer… I mean a single OCD layer with your perfectly cut sweet potatoes arranged neatly on your sheet pan, and – yes – flipped one by one halfway through baking.

I’ve had different results from this recipe depending on (presumably) the water content of my sweet potatoes and the accuracy of the oven.  I ‘m not 100% sure whether sweet potatoes actually have different water levels, but I do know that one of the ovens I made these in cooked very unevenly and was never actually at the temperature it said it was… So if you do everything I say and you still somehow end up with imperfect baked sweet potato fries, don’t fret.  Just let them cool and throw them back in the oven; I promise the second cooking will crisp them right up.

Baked Sweet Potato Fries
Ingredients

2 lbs sweet potatoes (2-3 sweet potatoes)
2 tbsp cornstarch, divided
3 tbsp vegetable oil, divided
salt to taste

Recipe

Mise en place, and read the recipe all the way through.
Slice sweet potatoes into 1/4 inch chunks. I found that shorter fries (3-4 inches) worked best, so cut your potatoes in half if you need to.
Dry sweet potatoes in a clean kitchen towel, patting to remove as much moisture as possible.
Split into two even batches and set one half aside.
Toss the first batch in 1 TBSP cornstarch, tossing to coat completely. The cornstarch will wick away any excess moisture and should keep your baked sweet potato fries from coming up soggy.
Add 1.5 TBSP vegetable oil to the bowl and toss to coat the sweet potatoes completely.
Transfer to a rimmed baking sheet and line up evenly, making sure to leave space between the fries so that they crisp instead of steaming.
Bake in an oven preheated to 400 degrees fahrenheit for 10 minutes, then remove and flip all fries, and return to the oven for another 10 minutes.
Transfer to a plate and season with salt to taste.
Repeat with the second batch.
Enjoy!

Facebook
Twitter
Pinterest
Bloglovin
Instagram

gameday snacks: cheesiest cheddar popcorn [week 17]

It’s the last week of the regular season!  This means that my gameday snacks series has officially been a success – big, HUGE thanks to all of you for coming back every Sunday to read what I’ve written.  I’ve published (including this post) 16 delicious recipes for you and your friends to enjoy on NFL Sunday (/Monday/Thursday), and have hopefully encouraged you to explore your own creativity in the kitchen.  Your top 3 favorite recipes this season were:

1. Mac & Cheese Cups (Week 2)

Mac and Cheese Cups

Mac and Cheese Cups

2. Spinach and Roast Chicken Lasagna Cups (Week 1)

Spinach and Roast Chicken Lasagna Cups

Week 1: Spinach and Roast Chicken Lasagna Cups

And last but not least (and the only top recipe from the 2nd half of the season!)…

3. Fried Ravioli

Fried Ravioli

Fried Ravioli

So now for this week’s special treat: cheddar popcorn.  This is a copycat recipe, and my attempt at bringing my favorite Chicago treat, Garrett Popcorn, into my own kitchen.  If you’ve never been to Chicago, just imagine the best cheddar popcorn you’ve ever tasted, and that’s Garrett’s cheddar popcorn. You can order a tin online if you want a firsthand experience without the Chicago trip.  The Chicago mix is their staple and is half cheddar popcorn and half caramel corn… I’m not huge on the latter, so I chose to recreate the cheddar half only.

Cheddar Popcorn

Cheddar Popcorn

All things considered, this recipe was actually incredibly easy.  I found a foolproof stovetop popcorn method over at Simply Recipes, which left me with just one un-popped kernel in the entire batch.  You’ll need to cook your popcorn in 2 batches, otherwise your pan will overflow – a potentially dangerous situation considering the ingredients are hot oil and a food that explodes during the cooking process.

Cheddar Popcorn

Cheddar Popcorn

I packaged my leftover popcorn up in a tin and brought it to a friend’s house for a holiday treat.  They were shocked that I was able to create such a classic taste, and even more surprised when I told them how easy it was.  The only tricky part of this recipe is the procurement of the cheddar powder.  Most specialty spice shops should carry it – if there is not one near you, you should be able to order some online.  Keep an eye out for other cheeses, too!  I’ve seen powdered Asiago, American, Cheddar, and Parmesan.  If you’re not into cheddar, pick the cheese you like best and try using it instead.

Cheddar Popcorn

Cheddar Popcorn

[amd-zlrecipe-recipe:27]

Happy eating!

gameday snacks: loaded nachos [week 10]

This post is going to be part recipe and part rant.  Why, you ask?  I have a pet peeve (okay, I have many pet peeves, but I’ll only go into one of them today) about improperly prepared nachos.  Context: you’re out at dinner with friends, and you decide, “Why yes, it would be a terrific idea for the 4 of us to split nachos before a main course of romaine salads with no dressing, no cheese, no bacon, and no croutons!”  After what feels like forever, your calorific starter makes its way to the table; the cheese is oozing and the meat is sizzling.  You know you made the right choice.  You all eagerly dive into the chips, cheese, guac, and sour cream…only to discover that the restaurant only bothered to line the outermost chips with toppings; an epically tall tower of bare tortilla chips now sits as the centerpiece of your forlorn table.  You know you’ll finish the dish, but you feel completely mislead and totally disappointed by the “nachos” for which you just shelled out twelve bucks.

If the above scene has never occurred in your life, count your blessings, skim my pretty photos, and skip to the recipe section.  If you feel me, read on as I describe why it’s so critical to layer your nacho ingredients to achieve Fully Loaded Nacho status and fall asleep a happy person.

Spicy Loaded Nachos

Spicy Loaded Nachos

Perhaps I should have titled this post “Toppings on Toppings on Toppings” – it would have been more accurate.  Look closely at the chips in the above photo and you’ll see that the cheese, chicken, jalapeños, and beans seemingly fall out of the center of the nachos.  THIS is how nachos should be!  You shouldn’t be punished for devouring the outermost layer first; you should be rewarded with fresh, new toppings to shovel into your mouth with a perfectly curled corn chip.

Spicy Loaded Nachos

Spicy Loaded Nachos

I did keep the ingredient list simple here – while these nachos are Fully Loaded, I didn’t want to put so many different ingredients into them that the result was a weird smorgasbord of flavors that was reminiscent of meals in college between grocery store trips.  The chicken is cooked with onions and bell peppers; adding pepper jack, cheddar, black beans, and jalapeño sounded like it would get me a big punch of flavor at a pretty low cost.  Definitely a plus since I’ve seen 4 people take down an entire bag of tortilla chips.  And by “seen,” I mean I have been one of four people who demolished an entire bag of tortilla chips.  It’s okay, you can judge me.

Spicy Loaded Nachos

Spicy Loaded Nachos

Don’t freak out about the amount of jalapeño you’re seeing here.  The creaminess of the cheese helps tame the spice of the pepper.  If you keep the slices thin, you’ll get a pleasant “oh hey” from any peppered chip as opposed to a “HELLO!” that will hit your tongue with bigger slices.  And hey, if you’re thinking pepper jack cheese is plenty of heat for you, then add some chopped tomato in place of the jalapeño and call it a day.

Spicy Loaded Nachos

Spicy Loaded Nachos

Please just take a minute to appreciate the fact that the chip above was pulled from the center of the pile.  And the ooey, gooey cheese is holding all of the ingredients, which resulted in the perfect bite.

Okay, I’ll get off my soap box and give you the recipe and notes.

1) Make the chicken the night before for even easier gameday preparation.
2) Even better: double the chicken recipe and have fajitas for dinner on Saturday, then nachos on Sunday.
3) Serve these with your favorite dips.  I like sour cream and my boyfriend likes salsa – I usually save the guac for smaller groups since avocados can get a little expensive, but if you’ve gotta have it, you’ve gotta have it.

As always, there’s tons of room for variation with this recipe.  Try the marinade on pork or steak, use refried beans if you prefer, swap out the cheeses – whatever floats your boat!  Happy eating 🙂

Spicy Loaded Nachos

Spicy Loaded Nachos

[amd-zlrecipe-recipe:20]


lighter chicken salad

Chicken salad is an all-time favorite of mine; trouble is, I grew up eating my dad’s, which went so light on the mayo that it barely held together.  I remember exactly where I was when real-world chicken salad slapped me in the mouth with its offensive amounts of mayonnaise along with its complete lack of flavor.  I’m pretty sure this sandwich had more mayo than chicken; I felt like I was stuck in the middle of a practical joke, and was horrified when my friend raved about how much she loved chicken salad from this particular deli.  I was thinking, “you mean… this is how it’s SUPPOSED to be?!”

I’m here to tell you that there is a middle ground – and it’s not light mayo (sorry, but ew.)

Lighter Chicken Salad

Lighter Chicken Salad

See?  It’s creamy!

And before you freak out about why that chicken salad isn’t happy resting between two slices of bread… It’s pretty fantastic served as a snack with peppery water crackers.  Try it.  If you don’t like it, you’re probably crazy.  (Just kidding, of course.)

Lighter Chicken Salad

Lighter Chicken Salad

So here are my tricks for making a “light” version of a classic that I genuinely enjoy eating. Also, this post may be something of an attempt to prove that I can make more than just comfort food.  Whatever.

1) I use half mayonnaise and half 2% Greek yogurt.  You won’t even taste the tang of the yogurt – the mayo flavor is stronger.
2) I use lemon zest and a tiny squeeze of lemon juice.  The lemon juice and zest (btw, zest over your bowl to catch all of the oils) give the chicken salad some citrusy aromatics which keep the flavor crisp and fresh.
3) I put apple and celery in it.  No onion breath for me; apples and celery are both filling ingredients that contribute to the flavor and texture of the dish like an onion would – they just do it better.
4) I don’t chop up 5 different herbs.  Dill is traditional, but I to use tarragon.  It goes well with the citrus and the apple.
5) This probably should have been number one: use bone-in skin-on roast chicken.  Buy a double breast (it’s cheaper that way) and roast it yourself at 425 for 20-30 minutes (depends on size).  The chicken will taste much better on its own, which will carry through to the overall taste of the salad.

Lighter Chicken Salad

Lighter Chicken Salad

The serving options here are extensive.  As you can see, I’m partial to a big bowl and some artfully arranged crackers.  Gluten-free?  Grab some butter lettuce and make wraps.  Still craving that sandwich?  Fine, you earned it.  Just promise you’ll give the crackers a try, okay?

Lighter Chicken Salad

Lighter Chicken Salad

Try your own herb and seasoning variations and let me know what you come up with!  I personally love to chop up my leftover tandoori chicken and make a tandoori chicken salad; I bet a BBQ version would also be great.  Get creative and have fun!

[amd-zlrecipe-recipe:19]

easy southwestern salad with chipotle ranch dressing

Image

Greetings from Napa!  It’s been an amazing weekend, and I can’t wait to get all my photos uploaded.  Full winery and dining recap is coming soon, but for today I’m excited to share one of my absolute favorite entree salads with you: the southwestern salad.

southwestern salad 3Anyone who knows me knows that I truly love salad.  I’ve never understood the disgruntled, “I’ll just have a salad,” dieters – especially since a lettuce-based dish does not guarantee a low calorie count or high health benefit.  As you’ve probably guessed by the photo above, this salad is not quite what I’d call healthy.  It is, however, delicious.  And don’t worry, I promise I’ll tell you how to make it a little more diet-friendly, if that’s your thing.  This is an entree size salad, so it’s pretty huge.  You could absolutely serve it as a side salad; you would get 2-3 times as many servings if you did.

One last note before the recipe: I recommend plating this salad individually as opposed to serving it family style simply because the “toppings” never seem to distribute evenly when I do it family style.  It’s also prettier that way – and remember, we eat first with our eyes and second with our mouths.  My favorite way to serve this is to actually to set up an assembly line of ingredients, provide each guest with a pre-dressed bed of lettuce, and let everyone construct their own masterpiece.  This strategy is also a great one to keep in mind when you’re trying to balance different dietary needs within one group – the vegans can skip the cheese, bacon, and tortilla strips (if necessary), the vegetarians can skip the bacon, and the gluten-free-ers can skip the tortilla strips.

southwestern salad 2Recipe
Prep time: 30 minutes
Cook time: 10 minutes
Total time: 40 minutes
Serves 4 (entree) – 8 (side)

Ingredients:
6 heads of romaine lettuce
6 slices of bacon
4 8″ or 10″ tortillas (I used locally made roasted garlic tortillas and they were divine)
2 ears of sweet yellow corn, or 1 can (rinsed and drained)
1 can black or pinto beans (rinsed and drained; I used black)
2 avocados
1 pint of cherry tomatoes, sliced in half or in rings, or 2 large tomatoes, diced
1 C grated pepperjack cheese (you can buy shredded or shred your own block.  I prefer the latter)
Chipotle Ranch to taste
1 can chipotle in adobo (try to avoid the one that comes with onions if you can)
1 bottle of your favorite ranch dressing (or homemade!)

Instructions

  1. To make chipotle ranch (which I do by the bottle because I use it often), use one of two techniques: combine an entire bottle of ranch and 1-4 chipotle peppers in a food processor and pulse away, or; mince 1-4 chipotle peppers and add to your bottle of dressing, shaking to combine.  I usually go for 3 peppers in my dressing because I like it to have a decent kick.  I’ve grown up eating spicy food.  To find your perfect spice level, start with 1 pepper and work your way up, tasting with each addition.
  2. Stack the tortillas and cut them in half, right down the middle.  Make a parallel cut in each half, so that you end up with 4 stacks of long strips of tortilla.  Now make perpendicular cuts in each long strip so that you end up with little tortilla rectangles – you want each strip to be about an inch long and a quarter inch wide.  Spread your tortilla strips in an even layer over a sheet pan, and bake at 375º for 8-12 minutes.  You want the tortilla strips to be golden brown and crunchy.
  3. While the tortilla strips are in the oven, cook the bacon in a non-stick skillet over medium heat until brown and crispy, about 10 minutes.  You can either cook in strips and crumble them into a bowl, or dice the bacon and cook the bacon pieces.  I diced mine first because I like the clean edges.  Drain on a plate lined with paper towels.
  4. If you’re using fresh corn, remove the kernels from the cob by running a paring knife down each ear.  You should also slice or dice your avocado and make sure your cheese is grated and your beans have been drained and rinsed.
  5. Rinse your romaine and either tear or cut it into bite-size pieces.  Dress the greens to taste and toss.
  6. Plate into 4 big bowls or 8 small bowls, and top with each ingredient, or set up an assembly line and let your guests assemble their own!

southwestern salad 1Want a healthier version?  Skip the bacon, tortilla strips, and ranch dressing; add  instead 1 chicken breast per person (grilled, poached, or roasted), a cilantro vinaigrette (Trader Joe’s has a great one), and some grated carrots.

Do you have leftover corn and black beans?  Here’s a few use-up ideas:

  1. Shred up part of a roast chicken or rotisserie chicken and toss it, along with corn and beans, into some chicken stock.  Too warm for soup?  Freeze it.  You’ll be glad you did next time you’re sick and there’s no one around to make or bring you some soup.
  2. Make a dip.  Dice up some tomatoes, add salt and pepper to taste, a drizzle of olive oil, a little bit of cilantro, and maybe even a squeeze of lime and some diced avocado.  Use your favorite chip to scoop it into your mouth.  I like tortilla.
  3. Not into dip?  Make nachos.
  4. Get creative!  How do you use up your leftovers?  I want to know!

almond currant granola

I sat here staring at my screen for a solid hour trying to figure out what to say about granola.  I still haven’t hit on anything earth shattering.  Granola is just plain good, okay?  It’s crunchy, it’s clumpy, it’s kind of sweet but just a little bit salty, and the flavors are literally endless.  You can make it healthy, or you can turn it into a dessert; you can pair it with milk, yogurt, frozen yogurt, ice cream, pudding… you catch my drift, right?  It’s versatile.

What I’m really trying to say is this: granola is underrated.  Don’t get me wrong, I love a good bacon-egg-and-cheese as much as the next person (especially the morning after a late night out…), but I feel significantly less guilty with a belly full of granola.  It has just the right amount of carbyness (yes, that’s a real word) and a little kick of protein, so it keeps me feeling full until lunch rolls around.  Another reason to love granola: it’s. so. easy.  Seriously, I spent 10 minutes mixing everything together and came out with 10 mornings of custom granola.  It’s way cheaper than the $6, 5 serving “gourmet” granola the supermarket carries, it only has stuff I like in it, and I have total control over the sweetness – and source of sweetness.  Okay, enough, you either like granola or you don’t.  I hope it’s the former, and I hope you enjoy this recipe!

(Also, I’m really obsessed with this bowl that I just got from Crate and Barrel.)

almond-currant granola

Almond-Currant Granola Recipe
Prep Time: 10 minutes
Cook Time: 40-50 minutes
Total Time: 1 hour
Yield: About 5 cups (10 half-cup servings)

Ingredients
2 1/4 C rolled oats (gluten free or regular)
1 1/2 C sliced almonds
1/2 tsp cinnamon
1/2 C honey
1/4 C canola oil
1/4 tsp kosher salt (or a pinch or two of table salt)
1/4 tsp vanilla
1 C dried currants

Instructions

  1. Preheat your oven to 250°
  2. Combine almonds, oats, and cinnamon in a large bowl
  3. Combine honey, oil, salt, and vanilla in a small bowl and whisk to combine. (Tip: fill your half-cup measure halfway with oil to get the quarter cup required.  Swirl the oil around so it coats the inside of the cup completely, then dump it in the bowl.  Now measure your honey in the lubed-up half-cup, and marvel at how easily it pours into the bowl.  No scraping required!)
  4. Dump the wet into the dry and stir until the oats and nuts are completely covered in the honey and oil mixture.  Yes, it’s enough liquid, just keep mixing.
  5. Throw it all on a rimmed baking sheet, flatten to one even layer, and put it in the oven for 30 minutes. Most recipes tell you to toss the granola every 15 minutes, but I found this to be unnecessary in my oven.  If your oven has hot spots, you should toss it around and re-flatten into an even layer.  If you’re not sure if your oven has hot spots, err on the side of caution and toss.  Make sure you remove the pan and close the oven door while you do this (i.e. no lazy pulling the rack half out of the oven and half-heartedly stirring with a spatula.  Come on, guys.)
  6. Crank the heat up to 325°.  This time, you need to take the granola out and toss it around before you get it nice and brown.
  7. Leave the granola in at the higher temperature for 10-15 minutes, or until browned to your taste.  I like my granola pretty GBD (that’s golden-brown-and-delicious for anyone who doesn’t watch Alton Brown as religiously as I do)
  8. This is the most important part.  Remove from the oven, and press with your spatula the way you used to press your burgers to make them sizzle more (but stopped doing because it ruins the meat, right?).  The clump and crunch set in while the granola is cooling, so you want to press the oats and nuts together as much as possible to promote the clumpy-crunchy-goodness.  Let it sit for about 10 minutes, or until cool enough to touch
  9. Gently break the granola into small clumps, add the currants, and toss to combine.  I do this with my hands directly on the sheet pan, but you’re welcome to use a spatula and/or toss in a bowl.

For this recipe, I chose almonds because they were the cheapest nut in the market.  The first time I made this, I actually found whole Marcona almonds and chopped them up.  They were really tasty, but I did prefer the ease and consistent texture and size of the sliced ones I used this time.  I was originally looking for dried cranberries (I love the tartness they bring), but when I saw the local dried currants and the fact that they were also the most cost-effective dried fruit on the shelf, I changed my plan.  As I mentioned earlier, this recipe is really versatile, so please use it as a base for your own creativity!  You could try adding flax seeds, if that’s your thing.  You could make it sweeter by swapping out half the honey for sugar – and if you used brown sugar, you could use pecans instead of almonds, and apples instead of currants, and you’d have an apple pie granola.  the possibilities are truly endless, so please experiment and let me know what flavor combos you come up with!

happy eating!